
How I Prepare Moka Today: The Lessons Behind My Current Method
From the method I inherited from my nonno to a framework built through flow, taste, grind size and many imperfect cups.
If you have followed Antonio’s Coffee Journey for a while, you will already know that the moka pot has never been just another brewer for me. It is tied to family, routine and memory. It is also the brewing method that has probably forced me to question the greatest number of things I once considered obvious.
This article is connected to My Moka Journey, my experiments with Marsellesa, the tests with La Genovese Oro, and everything I observed after fitting an E&B Lab filter and adding AeroPress paper. Those articles recorded individual stages. Here, I want to bring their lessons together.
I do not want to offer a universal recipe, because I no longer believe one exists. Numbers may be useful starting points, but every coffee behaves differently. Every basket has its own capacity, and even similarly roasted coffees can require very different grind settings.
My method today is not a fixed recipe, but a process: fill the basket properly, distribute carefully, control the heat, read the flow, taste the cup, and adjust.
The moka method I inherited
Before I began studying moka more seriously, I followed my nonno’s method almost step by step.
I poured water into the boiler by eye, stopping somewhere below the safety valve. I placed the basket into the boiler, took pre-ground coffee and filled it with a teaspoon, deliberately forming a small mound above the rim. I screwed the moka pot together, placed it on the smallest gas burner and kept the flame low.
Then I waited.
When the moka began to gurgle, I turned off the flame. I poured all the coffee into a small jug, added two or three teaspoons of sugar, mixed it and served it.
Nothing was weighed. The mound, the water close to the valve and the final gurgle were not decisions I had reached through tasting. They were simply the method handed down to me. Everything came from tradition.
Measured by eye
Somewhere below the safety valve, without considering the coffee or desired extraction.
The traditional mound
Pre-ground coffee spooned into the basket and deliberately left above the rim.
Wait for the gurgle
The extraction continued until the moka announced, loudly, that it had already gone too far.
The low flame is almost the only part of that original routine that remains in my method today.
The coffee was usually bitter, not particularly aromatic and sometimes marked by burnt flavours. I found it difficult to accept that this was simply how moka had to taste, yet the answer around me was often the same: coffee had always been prepared this way.
This is not a rejection of Italian coffee culture. Tradition preserves gestures and memories that matter enormously, but it can also become something we are afraid to question. At home — and sometimes at the bar — bitterness and burnt flavours can become so familiar that they feel like proof of authenticity.
My question was simple: what if the moka pot was not the problem? What if some elements of the method had been lost, simplified or repeated for so long that nobody asked what they were doing to the cup?
What if the moka pot was not the problem — and the part I needed to question was the method?
From inherited instructions to a working framework
The most important change was learning to see dose, water, grind, distribution and heat as connected variables.
Time alone does not tell me whether a brew is good, and a grind setting has little meaning without the coffee, basket, water and filtration around it. The final judge is the cup.
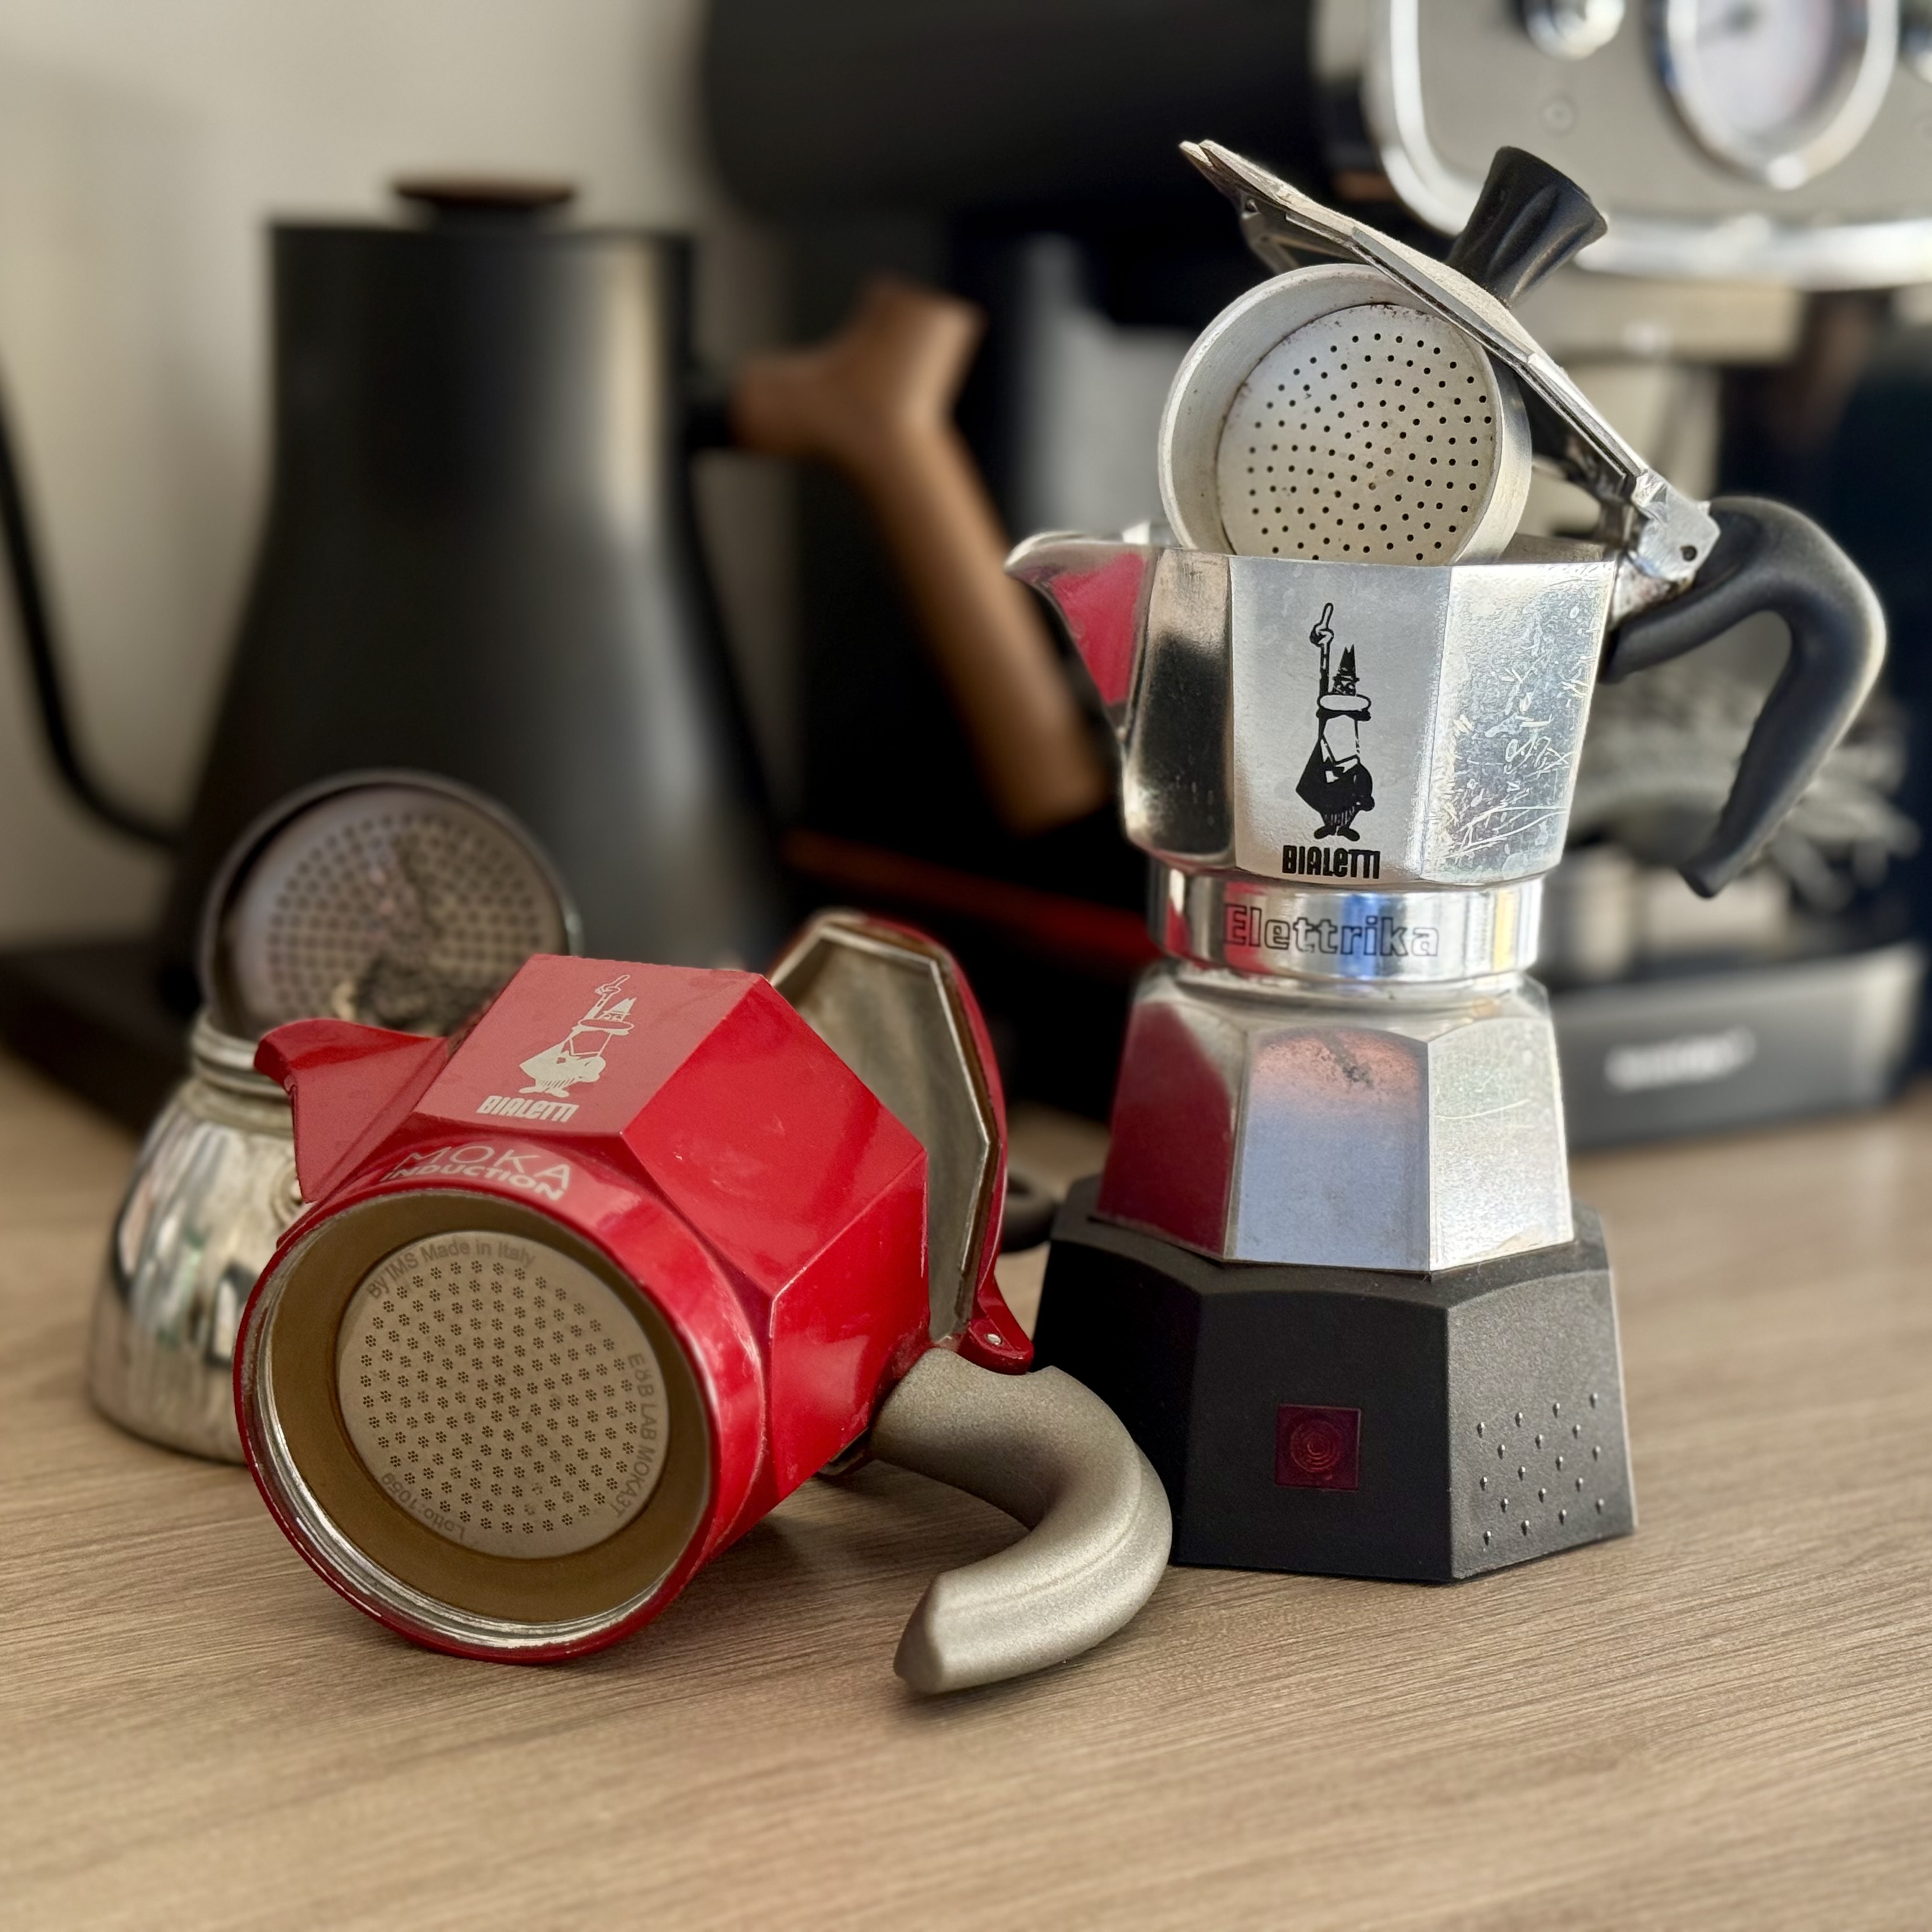
Bialetti Elettrika · two-cup
My practical everyday moka. It normally holds around 12–13 grams of an Italian-style coffee and works with roughly 60–70 grams of water.
Moka Induction · four-cup
My “competition moka”, permanently fitted with an E&B Lab filter and used for my most precise experiments. It often takes 18–20 grams and around 90–110 grams of water.
Why I still use the Kingrinder K6: although I appreciate the Pietro’s flat M burrs for pour-over, for moka I value the fines produced by the K6. They are part of the extraction behaviour I want to control, not automatically eliminate.
How I prepare my moka today
I let the basket decide
The moka basket works by volume before it works by weight. The coffee must fill it to the rim and finish level. Because coffees have different densities, the weight changes from one bag to another.
The basket remains full; the number changes because the coffee changes.
What I never do is tamp. A moka needs an even bed, not an espresso puck. Compression adds unnecessary resistance and can lead towards bitterness, irregular extraction and burnt flavours.
WDT is not optional
I use a dosing funnel, then a WDT tool to break up clumps and distribute the grounds through the full depth of the basket.
I give the basket a few small taps, not to compress the coffee but to remove empty spaces. If coffee remains above the rim, I level it without pressing.
I also clean every trace of coffee from the rim before assembling the moka. The seal must be as tight and clean as possible.
For the coffee, not the valve
The safety valve is not my sensory recipe. More water creates a longer extraction. Less water produces a shorter, more concentrated cup and avoids part of the pale final phase that can bring bitterness, dryness and dilution.
I normally use filtered or bottled water at room temperature. With a light roast, I may heat it, but I currently stop at a maximum of about 70°C.
Low, constant, then off
On induction, I normally use power level 4 or 5 out of 9. On gas, I use the smallest burner with the flame almost at minimum. I keep that power constant until the moment I switch it off.
The lid stays open. A good flow begins slowly, becomes continuous, and then starts to accelerate. That first acceleration is my signal to switch off. Residual heat completes the useful part of the extraction.
I then remove the moka pot from the hob, stir the coffee directly in the upper chamber and serve it.
I record time while developing a recipe, but only as a repeatability check. A large change tells me that I have probably not reproduced the process accurately. Once it becomes consistent, I brew towards the behaviour of the moka, not a predetermined number of seconds.
Anne Caron’s New-Old Sarchimor
One of the clearest examples of my present method is a coffee I have not previously featured on the blog: a medium-roasted New-Old Sarchimor from India, roasted by Anne Caron.
I switched the heat off as soon as the coffee covered the bottom of the upper chamber and the flow began to accelerate.
The result was remarkably balanced: intense without becoming heavy, distinctly fruity, and marked by citrus notes. It was not the product of a universal medium-roast recipe. It was the result of adapting the framework to that coffee.
What the flow tells me
The flow is a live description of what is happening inside the moka.
Fast from the beginning
I first suspect excessive heat, although insufficient resistance can also contribute.
Sudden acceleration
The boiler is approaching its final phase. That is when I stop adding energy.
Pale too early
If the coffee is pale from the beginning, the basket may not contain enough coffee.
Irregular jet
This often points towards a bed that is too compact or unevenly distributed.
Late bubbles
Early bubbles do not worry me. Bubbles at the end mean I have gone too far.
Gurgling or spraying
Gurgling means the useful extraction has ended. Violent sprays suggest excessive heat.
Allowing the moka to continue through that final phase was one of the most important habits I abandoned. The last water travels through the coffee at a more aggressive stage of the brew and can carry bitterness, burnt flavours and very little of the aromatic character I actually want.
Waiting for the gurgle does not complete my coffee; it usually unbalances it.
Grind size: my first adjustment, never a universal number
When a new coffee does not work, grind size is normally the first variable I adjust. I then use the amount of water to refine extraction and concentration.
There are useful starting points. With an Italian espresso-style coffee, I might begin around 60 clicks on the K6. With a medium roast, I might begin around 45–50. But these are only first tests. The Anne Caron worked at 58 clicks. Marsellesa eventually took me all the way to 37.
This is why I do not want readers to copy a number and assume the work is finished. I normally move by two or three clicks and change only one variable between tests.
From 60 clicks to 37
With around 15.4 grams in the Elettrika and water below the valve, the final cup became intensely aromatic and far more balanced, retaining only a gentle final acidity.
The lesson was not that 37 clicks is correct. It was that a medium-light coffee may need a much finer grind than an Italian blend to reach balance, sweetness and enough extraction.
From watery to clear and intense
An early test with 17.2 grams, 165 grams of water and 65 clicks was pleasant but far too watery.
The final recipe used 19.8 grams, 100 grams of water, 62 clicks and AeroPress paper. The cup became clearer and more balanced, with chocolate, toasted hazelnut and spice.
Because the basket is filled by volume, coffee and grind can change the mass it holds. Reducing the water helped me control acidity and avoid an unnecessarily long final extraction. No single adjustment created the result: grind, dose, water and filtration worked together through successive tests.
There was no single spectacular failure that taught me everything. Almost every successful recipe began with an imperfect cup. Those early failures are the process.
My “competition moka”: E&B Lab and AeroPress paper
E&B Lab filter
Compared with the original Bialetti filter, the E&B Lab allows fewer residues into the cup and improves the flow.
I do not remember a controlled same-recipe comparison well enough to attribute a precise flavour difference to it alone, and I prefer that honesty to turning an accessory into a miracle solution.
Today it remains permanently installed on my Moka Induction because it is part of the configuration I know and trust.
AeroPress paper
I wet a new paper for every brew and place it against the E&B Lab filter. It captures more oils and fines, making the aromas easier to distinguish.
It also adds resistance, which sometimes means grinding slightly coarser, although I have never experienced blockage or early sputtering because of it.
Useful with Italian coffee; indispensable for me with medium and light roasts.
Italian coffee and specialty coffee
The more forgiving match
A good Italian coffee is still the easier and more immediately natural match for the moka pot. I look for balance, intensity, cocoa, nuts and roasted-fruit flavours.
Fruit, flowers and controlled acidity
I want fruit and floral notes, with acidity that is clearly present but never dominant. I normally move finer first. For a particularly light roast, I may also use water heated up to 70°C and rely on paper filtration.
The preparation itself does not change: the basket remains full and level, distribution remains careful, the heat remains controlled and the flow determines when I stop. Only the working values change.
What is settled, what is personal, and what remains flexible
The principles
Fill the basket, distribute evenly, never tamp, keep the heat low, observe the flow, stop at the first acceleration, taste, and adjust mainly one variable at a time.
The equipment choices
The K6, permanently fitted E&B Lab filter and competition-style Moka Induction belong to my setup, not to every reader’s.
The working values
Exact dose, water, temperature and grind must remain flexible. The core framework is settled, but every new coffee tests its application.
If my moka tastes like this, I change this
These are not automatic corrections. They are the first questions I ask before the cup tells me where to go next.
I shorten before pushing further
I ask whether too much water passed through the bed or I continued into the pale final phase. I shorten the brew or reduce the water. If the flow suggests excessive resistance, I move two or three clicks coarser and check heat and distribution.
I decide whether it is acidity or under-extraction
If the cup is weak, sharp and lacking sweetness, I grind finer. If necessary, I then use slightly warmer water or paper. If it has enough intensity but acidity dominates, I test less water and taste again.
I reduce the boiler water
I reduce the water rather than extracting further and check that the basket was full. A shorter, well-extracted moka can be diluted afterwards; bitterness caused by too much water through the bed cannot be removed.
I use bypass, if the extraction is good
I decide whether it is simply concentrated or actually over-extracted. If balanced but too strong, I add a little hot water afterwards instead of increasing boiler water and risking a longer, harsher extraction.
I check heat, resistance and fill
I check the heat first, especially when coffee rushes out from the beginning. I then consider a finer grind and verify that the basket was full and evenly distributed. The cup tells me which cause is most likely.
I look for excess resistance
I check for an overly fine grind, too much settling or accidental compression. Paper adds resistance, so I may move slightly coarser, but I do not automatically remove it from a light-roast recipe.
My first suspicion is excessive heat
I lower the power, make sure the burner is smaller than the moka base and inspect distribution. In my experience, violent early spraying mainly indicates an extraction that has become too hot and aggressive.
The Moka Course
This article explains the method I use today, but the complete technical framework comes from months of experiments, tasting and note-taking.
I collected that work in The Moka Course: a downloadable guide covering dose, water, grind size, roast level, heat, paper filtration, flow diagnosis, practical decision trees and a printable brew log.
Download The Moka Course · PDFIt is not a book of immutable recipes. It is designed to help you understand what your moka is doing and decide what to change next.
My method today, not my final method
The way I prepare moka today is more controlled than the method I inherited, but also more attentive. Measuring gives me consistency, watching the flow tells me when numbers are no longer enough, and tasting tells me whether the process made sense.
I have not abandoned tradition. I have tried to understand it, preserve what still works and question what repeatedly produced bitter, burnt and unbalanced coffee. My nonno’s low flame remains. The mound, the fixed water level and the wait for the final gurgle do not.
This framework is not the final destination of my moka journey. It is simply the most conscious way I know to prepare one today. The next coffee — especially the next light roast — may force me to refine it again.
That possibility is not a weakness in the method. It is the reason the journey remains interesting.
Do you already brew with a moka pot, or are you thinking of trying one?
Is there a part of the traditional moka method you have always followed without questioning it?
When your moka tastes unbalanced, which variable do you change first?


Leave a comment